Showing posts with label my recipes. Show all posts

Saturday, May 22, 2021

How to Make Ghee


Though Ghee is typically referred to as clarified butter, the process of making ghee differs from that of clarified butter. For ghee, the butter is simmered till the milk solids settle in the bottom and the butter is completely caramelized. Ghee has a nutty flavor and is very aromatic.

Ghee is used in Indian cooking in variety of ways. It is the fat of choice in all Indian sweets. In addition, ghee is mixed into rice and dal; spread on roti and used for tempering rasam.

Making ghee is easy but does requires care and attention. One can use either salted or unsalted butter. Except that the milk solid residue from salted butter will be very salty and must be kept in consideration if the residue is used in any other preparation. For example, I  reuse the pan with the left over residue for making vegetables and if it is residue from salted butter, I will use less salt for the vegetables.


How to make ghee:

Place the butter in a heavy pan, and melt it over low simmer flame. As the butter melts, it will foam a little bit. As it continues to heat, the foam will clear up and butter will turn into clear pale yellow liquid. If you stop here, you will get clarified butter. However, if you want ghee, continue to heat the butter till the liquid turns brown. Turn off the heat and let the liquid cool. Once it is cooled, pour into a container. It will keep well for a month or more at room temperature. No need to refrigerate.


Thanks for visiting.

Wednesday, October 12, 2016

Cooking With Okra: Tips and Techniques


Cooking With Okra: Tips and Techniques

Okra, also called ladies' finger, is a favored vegetable in Indian cuisine. My mother used to cook in three different ways: stir fried, stuffed and as crispy toppings on yogurt. As a curry, it partners well with both rice and roti.


Here in the US, it is not a popular vegetable (except in the South) and is almost never found in the regular grocery stores. Which is a pity because okra is a nutritious vegetable high in dietary fiber and rich in vitamins and beta carotene. Okra is off putting to many because it becomes slimy or gooey during the cooking process. But prepared in the right way, it can be a tasty and nutritious addition to your vegetarian options. Below are some tips and techniques for getting the best out of this vegetable.

A. Choosing the best okra at the market or Growing Your Own

Okra is a summer plant and it tastes best when it is in season. When shopping for okra, look for one that is green, immature and slender. Thick and mature pods are woody and fibrous and unpleasant to eat. The freshness of an okra pod can be determined by bending and snapping its tip. A tender okra will break cleanly whereas a mature one will not (see below).


In the late 90s, before okra was abundantly available in Indian grocery stores, I used to grow okra in my vegetable garden. If you live in a place that has at least eight weeks of warm weather (day time temperatures above 70 deg), you can grow okra in your backyard. Okra is remarkably easy to grow. All it need is lots of sun and water during the growing season. It produces multiple harvests in a single season and as long as the pods are picked frequently, it will reproduce itself abundantly. 

B. Preparing Okra for Cooking Without the Sliminess

Okra gets slimy when it comes into contact with water and becomes moist. There are several ways to prepare slime-free okra. I have developed a method that works well for me: First I wash and drain them in a colander (I do wash them to remove dirt and any residual pesticides). Then I thoroughly wipe them dry with paper towels. Finally, I air dry them for about 30 minutes. Using a dry cutting board and knife I cut them without fear of any gooey liquid oozing out.


3. Cooking Okra

I cook okras in the typical Indian way. I saute using the standard Indian spices and oil. Again, there is no water involved in the cooking. Cooking them in high heat with oil creates a texture that is wonderfully crispy outside while tender inside.


Stir Fry Okra 

Okra with Tomatoes


Yogurt Topped with Crispy Okra

If you have any questions after reading this post, feel free to contact or comment.

Thanks for visiting.


Wednesday, October 5, 2016

Cauliflower Tikka: Whole Roasted Cauliflower


(This a repost of an older post with additional information).

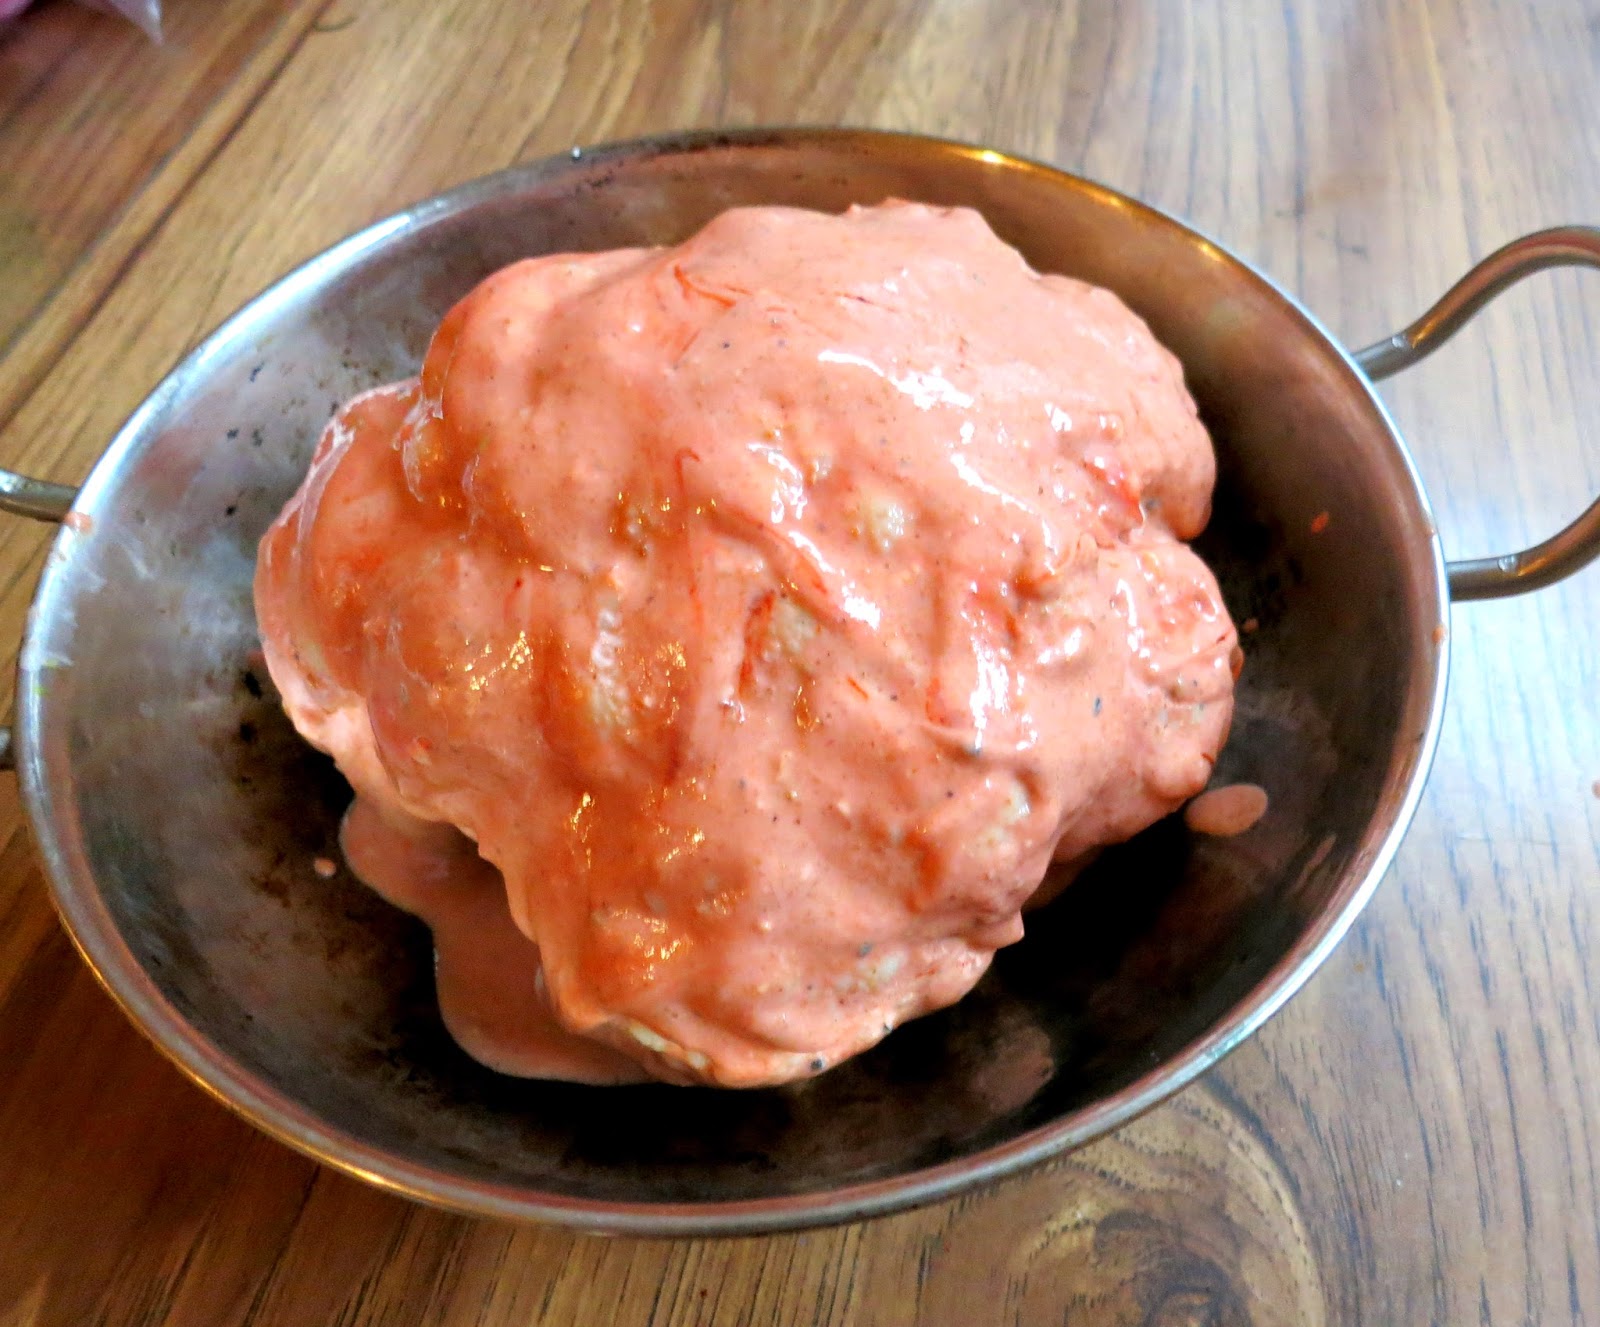
Today is the beginning of a five-day Thanksgiving break. However, at least for today, rain and snow have kept me tethered to home. A good thing because it gave me the time to try out this recipe: baking a whole head of cauliflower in the manner of chicken or paneer tikka masala which I have wanted to do for a long time. I took a deep breath and plowed ahead.

What you will need:

1. Whole head of cauliflower (I picked a small one because I was going to bake it in the toaster oven)

2. Store bought Tikka masala to taste (I used achari masala mainly because it was free of garlic as I don't use garlic in my cooking). Use masala sparingly as it can be overpowering.

3. Yogurt, enough to smother the vegetable completely

4. Tomato puree (optional) 1-2 tablespoon

5. One lemon to give additional tartness to the yogurt (optional)

6. Salt to taste

7. Coconut or olive oil, 1 tablespoon

8. Cumin seeds, 1 teaspoon

9. Chopped fresh mint leaves.

Note: If you are using tomatoes, you may want to reduce the amount of yogurt and lemon correspondingly.

Instructions:

1. Cut off the stalk and other green parts from the head leaving only the flower. When done, the head should sit flat.

2. Cook the whole flower in a pot of hot water. Do not cook it too soft, just al- dente. Remove it from water and drain it in a colander. Leave it for a while till it is completely dry.

3. In a bowl, mix yogurt, masala, tomato puree, lemon juice and salt. Dunk the cauliflower into the  yogurt mix till it is completely covered. Let it marinate for 1-3 hours. Transfer it to a baking dish.


4. Bake it at 350 deg for about 45 minutes. After that, broil it for another 15 minutes. As it cooks, water from the yogurt will collect at the bottom of the dish. Use a little bit of it to moisten the top to prevent the cauliflower from drying out as it is cooking, Remove it from the oven when the top of the head is completely dry. Transfer it to a plate.

5. Heat coconut or olive oil in a small frying pan. Roast the cumin seeds in the oil till it begin to crackle. Pour it over the cauliflower. Sprinkle it with chopped mint leaves.

6. Cut into wedges and enjoy with salad, rice or roti. You can eat it by itself with a dipping sauce like chipotle mayo, coriander/mint, or date chutney or any dressing of your liking.


Note:

Cauliflower is a cool weather vegetable and growing up in New Delhi I ate a lot of them during winter. It is highly nutritious and provides a well rounded meal when eaten with rotis (Indian bread) .
Here is another recipe using cauliflower

Please visit the Well-Being Secrets web site, a nutrition web site where you will find tons of recipes using cauliflower .


Thanks for visiting

Thursday, June 23, 2016

Paper Cut Art: Saffron


Papercut by Indira

Do-Something-Everyday, June 23, 2016

 Saffron, mainly used in the cuisines of India and the Middle East, is the most expensive spice in the world. It is derived from the flower of Crocus sativus.  Each crocus bears about four flowers, each with three red stigmas known as threads.

Photo courtesy Wikipedia

Photo courtesy Wikipedia

The threads are harvested by hand and dried to be used both as a flavoring and a colorant in food. Each flower produces about twelve threads and about 125 flowers are needed to produce one gram of saffron threads. The labor costs involved in the cultivation and the limited amount produced by the plants are the main reasons for the high cost of saffron. Thankfully, only a small amount is needed to add distinctive flavor and yellow color to food. To make the most of  the small amount of dried saffron, soak it in a few teaspoons of warm milk for a few minutes before adding it just as the dish approaches doneness. When buying saffron, which are sold at all Indian grocery stores, buy a small amount at a time, and store it in the freezer.

I love the taste and the color of saffron and it finds its way in many of the milk based desserts that I make. Below is Eggless Indian Tapioca Pudding topped with threads of saffron.  The complete recipe post is found here.


Thanks for visiting. Linked to Paint Party Friday.


Wednesday, May 11, 2016

What I Did on Mother's Day


Do-Something-Everyday, May 10, 2016

This Mother's Day I decided to stay home and cook a nice lunch for my husband and me (my husband did offer to take me out for lunch). We are empty-nesters and cooking has now become more of a pleasure than a chore.  The lunch was a combo of healthy and indulgent: cucumber-tomato pachadi (raita), Rajma (Indian kidney beans) and poori (fried Indian bread).

Sunday, April 5, 2015

Coconut Chocolate Fudge (Burfi)


This is one of the easiest and quickest desserts to make. It is also much lower in calories than a typical Indian sweet dish and it has the added advantage of being gluten-free and vegan. It is also a no-fail dessert. The worst thing that can happen is either the burfi comes out too soft or too crumbly. It is still sweetly edible.

If you have shredded coconut and sugar on hand, you can actually do this in fifteen minutes. I usually have a packet of dessicated (shredded and dried)  coconut (you can buy this from any Indian store) which I store in the freezer. Sugar, of course, is a regular staple in most kitchens.


Coconut Burfi

Prep time: 5 minutes
Cooking Time: 10-20 minutes

Ingredients

Dessicated coconut  1 cup
Sugar 1/2 cup (Whatever the amount of coconut you use, sugar is half of coconut. For me using more sugar makes the burfi too sweet.)
Unsweetened cocoa powder 1/4-1/2 teaspoon (optional)
Cardamom pods 3-4
Water 1 tablespoon
Coconut oil or ghee

Instructions

This is stove top cooking. Use a deep pan or skillet to make the burfi.

1. Completely grease a cookie sheet or a plate with coconut oil or ghee.

2. In a bowl mix coconut and cocoa powder.


3. Add water and sugar into the pan and heat over medium flame. Let the sugar dissolve completely. Heat till it reaches a thin syrupy consistency.


4. Add the coconut mix into dissolved sugar. With a spatula blend in the coconut thoroughly into the sugar syrup.

5. Stir the mix over the heat till the mixture thickens and start leaving the sides of the skillet. As it thickens it will coagulate like a ball. When that happens, turn the heat off and let it sit for a couple of minutes in the hot pan.


6. Turn the cooked mixture over to the greased plate and with the back of a spoon spread it evenly and thinly across the plate. Using a knife, score diagonally to cut into diamond shaped pieces.


Enjoy and try to limit yourself to one piece a day :)

Thanks for visiting.


Tuesday, March 24, 2015

Mushroom Spinach Peas Coconut Cashew Curry (Vegan)


An amazingly tasty dish prepared with simplest vegetables and with just a touch of exotic. Preparation and cooking time can be substantially reduced by using frozen peas and spinach and pre-washed and pre-cut mushroom. And none of these compromise the flavor is any way. What gives this dish its creamy texture is the addition  of coconut and cashews. It is also considerably lower in calories without the heavy cream that is typically use in such dishes.

Below are the cooking instructions. I have not given any measurements because you can really mix and match the vegetables and the condiments in any way you prefer:


Ingredients

Frozen spinach thawed, desired amount
Frozen peas thawed, desired amount
Pre-washed and cut mushrooms, desired amount
Potatoes, cooked and cubed
olive oil,  1-2 tablespoon
Chili powder or paprika, to taste
Turmeric, 1 teaspoon
Salt to taste
Cumin, 1/2-1 teaspoon
Dessicated coconut or coconut flakes, 1-2 tablespoon
Full cashew, 4-5

1. Soak cashews in warm water for about 15 minutes. Drain. Grind coconut and cashews in a blender with a little water till it is a smooth paste. Transfer the paste into a small dish.

2. Heat oil in a skillet. Add cumin and roast till it turns gold brown.

3. Add the mushrooms and cook till they turn soft.

4. Add the potatoes and sautee till they turn brown.

5. Add spinach and peas and heat till they are completed warmed. Add the coconut-cashew paste, salt and chili powder  to the vegetables along with some water. Let the whole mixture simmer for 5-10 minutes.

Remove from heat and serve with cooked rice or roti. Enjoy!


Wednesday, March 11, 2015

Dulce De Leche: South Indian Style (Thiratti Paal)


Thiratti Paal is similar to the Caribbean version of Dulce De Leche.  At core it is the same  sweetened milk, it is dense, textured and chewy and  therefore eaten straight. The process of its preparation is somewhat different. It is made from scratch with plain milk and sugar is added only  at the final stage of cooking.


It requires just three ingredients and the prep work is minimal. But it is not a quick dish to prepare and it requires a lot of your attention. At the end, when you pop a spoonful of thiratti paal into your mouth and taste the sublime sweetness of it, you will not grudge a single second that you spent in preparing it. Be warned. You will be tempted to consume a lot of it in one sitting!

Thiratti Paal (low calorie version)

Preparation time: 3 minutes
Cooking time: 2 hours

Ingredients

Low fat milk: 1/2 gallon
Sugar: 4 tablespoons
Ghee: 3 tablespoon
Cardamom seeds from 4-5 pods

Notes:

1. You will need to use an aluminum-clad dutch oven pot to cook the milk. The thick bottom will keep the milk from sticking to the bottom and burning.
2. On another post, I have described how to make  ghee. Ghee is added towards the end which enables the thickened milk to solidify and provides the richness to balance the sweetness of the sugar.

Instructions

1. Pour milk into the pot and begin heating on medium flame. Initially, stir the milk every ten minutes or so to keep it from sticking to the pot. But as the milk thickens, you will have stir more frequently and towards the end continuously. Make sure the milk does not boil over. See photos below.


2. As the milk thickens, it will slowly turn into a nutty brown color. After an hour and a half, the milk would have thickened and reduced to 1/4 of its original volume. At this point, add sugar and one tablespoon of ghee.

3. Continue to stir and periodically add some ghee. As you keep stirring the milk, it will slowly congeal into a solid mass. Turn the heat off and allow it to cook more in the residual heat.

4.  Transfer into a bowl and sprinkle with cardamom.

Enjoy!


Sunday, March 8, 2015

Cauliflower Curry


Cauliflower, which is becoming a trendy vegetable, got a shout-out from the New York Times in a recent article. The article called cauliflower "a feisty vegetable that can take a punch" and recommended cooking it with bold spices in high heat. It goes on to say "Asian spices marry well with cauliflower". Well indeed. In northern India, cauliflower (Phool gobi) is one of several winter time vegetables eaten with roti or Indian flat bread.


One of my favorite ways of making gobi curry is the one I learned from my mother. What my mother used to do was to add a tablespoon or two of gram flour (besan) when the curry is almost cooked and give the curry to good toss and saute it for a few extra minutes. What one gets is a texture and taste of pakoras without the oil and the deep frying.

Here is how to do it:

1. Cauliflower
2. Usual spices (salt, turmeric, chilli powder, masala)
3. One tablespoon of olive oil and one tablespoon coconut oil
4. 1-2 tablespoon of besan (gram flour)
4. Black mustard for tempering

Instructions

1. Cut the vegetable in medium sized chunks. The vegetable should be able to retain its shape after cooking.


2. In a pan heat oil and add the mustard.
3. After the mustard has finished popping, add the cut cauliflower.
4. Add the spices and saute in low heat till cauliflower is cooked. Cook it al dente. That is, it should still retain its shape and crunchiness.


5. Add the coconut oil now and sprinkle the besan on top. Toss with spatula so that the oil and besan coat the cauliflower uniformly.


6. Turn up the heat little and continue to saute till the besan turns brown.

7. Remove from heat and transfer to a dish. Serve with rice or roti.


Enjoy. Thanks for visiting