Do you mail yourself postcards from places you visit? If yes, here is an alternative to those cookie-cutter postcards--handmade journal. You can make it yourself, use it in your travels and, at the end of the journey, seal and mail it to yourself. You not only have a record of your travel experiences but also a mail from the place you had just visited. It is so cool. I have mailed them within US, from Canada and the UK. In all instances, they were delivered without fail.
Basically, this is a pamphlet style journal stitched into a 12" by 12" scrap paper. With a few nips and tucks, the scrap paper does double duty as a cover and an envelop. If you know how to make a pamphlet style journal, you are already half way there. I have also provided graphic instructions for making the journal. Please note that I have used the terms journal and notebook interchangeably.
Though this is not an art piece, it deals with the theme of post and postage. One of the journal covers is made with all stamp paper. So I am linking this post to Art*Journal*Journey.
Materials and tools needed:
1. Kraft or scrap paper 12" x 12" for cover cum envelop
2. White copy paper, 8.5" by 11", 5 sheets for notebook
3. Embroidery thread and needle with a large eye
4. An awl for piercing hole (or any sharp object that can poke hole into a paper)
5. Scissors
Note:This is a slim journal made of 10-20 pages. This will keep the postage charges at reasonable level. I have used colorful cover pages. You may substitute plain Kraft paper.
Instructions
1. Fig 1-4: Take a 8.5" x 11" sheet paper. Fold it lengthwise (fig 2). Fold it widthwise (fig 3). Tear along the fold on the width side (fig 4). You should have two folded sheets, each measuring 5 1/2" by 4.25". Do steps 1-4 with the remaining sheets. You should now have ten folded sheets.
2. Figs 5-8: Take a single folded sheet. Along the fold, mark the center. Mark one inch from the top. Mark one inch from the bottom. Do the same with the remaining sheets. Tuck the sheets into each other like a notebook so that the marks are neatly aligned. Poke the awl from the inside through the center point all the way through the sheets. Do the same with the top point and the bottom point (Fig 8).
3. Figs 9-12: On the right side of the scrap paper, mark the center which is 6" from either side. Place the notebook on the inner side of the scrap paper as shown in Fig 10. The center hole on the notebook should align with the 6" mark. (The scrap paper I am using is plain on one side and that is the inner side. If you are using a paper that has print on both sides, you may either side for the inside.)
Fold over the left side of the scrap paper over the right side (Fig 11). Crease the fold and flip over the entire sheet (Fig 12).
4. Figs 13-16: The following steps are for making a pamphlet style notebook. Open the flap and using the notebook as the guide, mark the center, top and bottom points on the scrap paper (Figs 13 & 14). With the awl, make a hole on each marked point. Cut a piece of embroidery thread that is 3 times the length of the notebook. Thread the needle with one end of the thread longer than the other. (Fig 15).
Make sure the holes of the notebook are properly aligned with the holes on the cover sheet (Fig 15). Open the notebook and push the threaded needle from the inside center hole ( Fig 16) leaving a tail 3" long.
5. Figs 17- 20: From inside the center hole, bring the needle to the outside, marked 1(Fig 17). Push the needle into the hole on left from outside (marked 2) and bring it inside (Fig 18). Take the needle all the way across the top hole and push through from inside hole to outside (Figs 19 & 20).
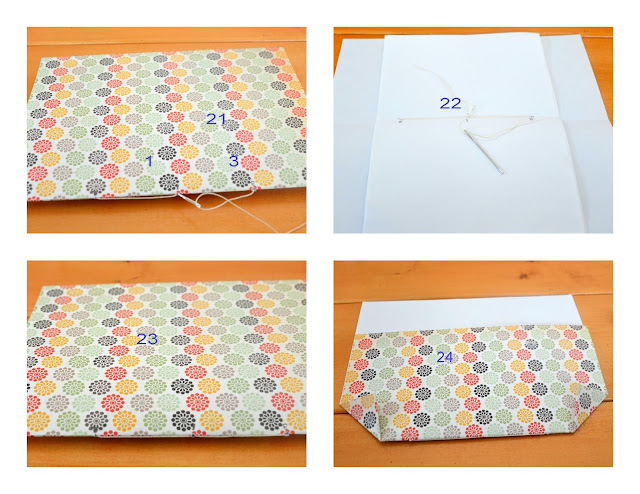
6. Figs 21-24: From hole 3, push the needle inside through the center hole (marked 1) and tie a secure knot with the tail. Trim off excess thread (Fig 22).
Close the journal and the cover the way it is shown in Fig 23. Flip over and fold the two edges as shown in Fig 24.
8. Figs 29-30: Fold the flapped side over to the side with the flat paper. It should look like Fig 29. Fold the excess paper as shown in Fig 30.
You have now an envelop journal.
I hope these instructions inspire you to make a few journals of your own. If you have any comments or suggestions about this tutorial, please feel free to do so.
Thanks for visiting.


